Powered by Blogger.

Auris Lothol

    • Home
    • Projects
    • Tutorials & Freebies
    • _J-fashion
    • _Historical
    • _Other
    • Lolita coords
    • Bobbin Lace
    • Shop
    • Museum
    • About Me
    • Deutsche Version
    Hello lovelies,

    sorry for my absence. I was on vacation and even though I was "only" at home, I had other things on my mind. We refurbished the kitchen, I sewed an Edwardian corset and played Assassin's creed odyssey most of the time.

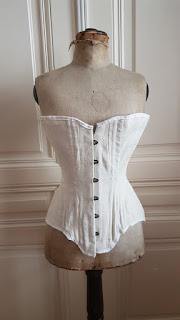
    But can you believe it? I finally finished my Edwardian corset after my first four attempts didn't work out. I used flimsy material or the wrong size and it somehow never fit me. You have no idea how happy I am, that it finally worked out and it fits me.

    It all started out when we cleaned our sewing room/guest room and I found two Edwardian corsets in different stages and decided to toss them and make a new one.

    The pattern was in a plastic bag next to the two corsets, bless past me for being so tidy, and I checked my size again, as the top and waist part was a size C and the hip a size E. I had traced them from the original pattern "Truly Victorian TVE 01: 1903 Edwardian corset".
    My sizes all were still correct and I pinned the pattern to the fabric. I decided to not go for any trim or fashion layer because if this attempt didn't work out either, I didn't waste too much fabric.

    a piece of white handmade linen fabric

    The linen fabric I used was medium-weight and I bought it at a market in Vienna, it was handwoven from weavers in east-Europe, either the Ukraine or Romania, I can't recall which one it was.

    cut pieces of an edwardian corset made from white linen

    close up from the edwardian linen pattern cut out

    three pieces of the edwardian corset sewn together

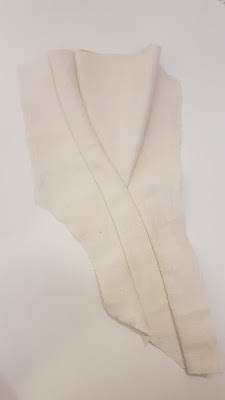
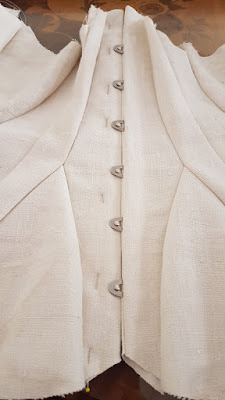
    I am really proud how pretty the bust gore looks.
    close up of the bust gore from the edwardian corset

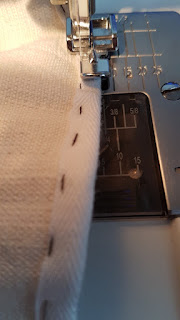
    I didn't go over the sides with a zig-zag stitch, which I usually do, because it was not mentioned in the pattern and I rued it in the end because the fabric frayed so much.

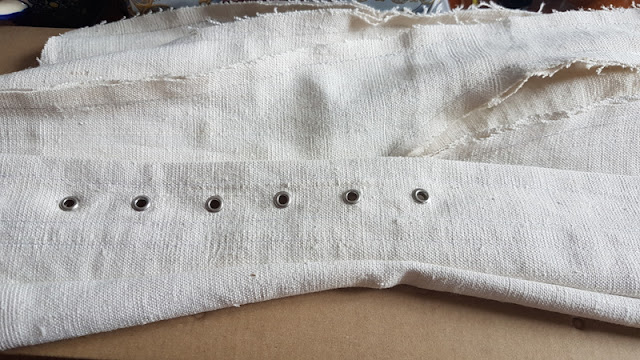
    Inserting the busk was done in a day, I already made a few corsets so this was nothing new.
    busk insertion of an edwardian white linen corset

    other part of the edwardian corset with the hooks
     I stamped the hooks onto the fabric by colouring them with my pink soluble pen.

    awl on a piece of a white linen edwardian corset


    white linen edwardian corset with half of its eyelets stamped into it

    Edwardian corset with all of the eyelets punched into it on both sides

    the front part from the edwardian corset is closed with the hook and eyes


    backpart of the edwardian corset with pins


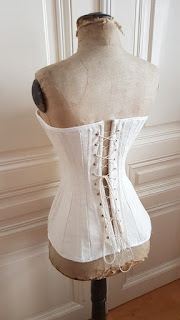
    When I did the first fitting I could almost close the top and waist. Weird! I should have done a size B at the top and the waist, as it seems like my body is really squishy. I kept it as it was and moved on.

    first fitting with a mirror selfie so the back is visible
    I used wide cotton tape for the boning tunnels and inserted the bonings but it was clear, that it was not working out and the second fitting showed that it was still "big".

    the edwardian corset is sewn together and laid out


    machine sewing the ribbon into the edwardian corset

    I was unsure of what to do because I had almost finished the corset but I decided to re-open it and take away 1cm on each side and it worked like a charm. The corset fitted much better.

    re-opened back part of the edwardian white linen corsetto make it smaller

     As the project was quite unplanned, I didn't have enough boning for the corset and had to go and buy some. I am so lucky, that there is one shop in Vienna that still sells corset making supplies and haberdashery.

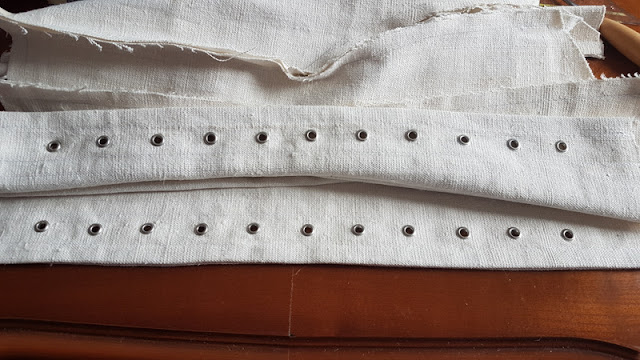
    The worst part was filing the edges of the metal. I could feel that my wrist was not all too happy with it because it got the blunt force off the vibration from filing. I had to stop after doing one side and continued with the other side the next day.
    Of course, I also had nothing to cover the raw edges. I used tape the last few times but it was not in my corset box so instead of that I used glue. Hot glue, to be precise. And it really worked out well. It is not historical at all but better than nothing and rust.

    file and metal boning

    rounded tip of the metal boning

    hot glue coveres the metal round tip of the boning


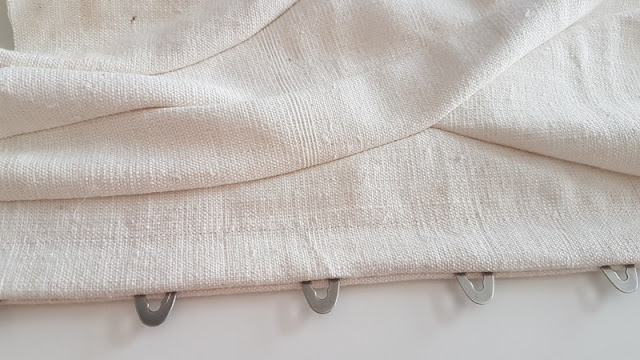
    I bound the corset with cotton twill tape and went over it with the machine. I wasn't careful and hit the metal boning two times, killing two needles. Oops.

    twill tape sewn onto the edwardian corset

    machine sewing the twill tape onto the corset

    I was done after exactly seven days, working on it a few hours per day. I really like the outcome and over the moon that I finally have an Edwardian corset.
    edwardian corset on an edwardian dress form

    side view of the edwardian corset on an edwardian dress form

    back view of the edwardian corset on an edwardian dress form

    back/side view of the edwardian corset on an edwardian dress form
    So, what next?
    I definitely need a complete Edwardian underwear set, and then a blouse, skirt, and a dress. At the moment I am working on a chemise with smocking, pintucks, and ruffles.

    Have a nice weekend,

    Auris Lothol
    Continue Reading
    Hello lovelies,

    today (and tomorrow) is the annual flea market located at Neubaugasse in Vienna. There is a booth for everything and it's an especially good place to find vintage fashion and items.
    It was there when I stumbled upon this amazing mannequin/dress form from the Edwardian era. It's probably from the 1900s?
    The fabric is ripped a bit at the top and bottom and there is a water (?) stain on the right bottom.


    Pictures of the front and side.
    One foot of three is missing but I added a peg. Now it's perfect.


    To be honest, I think the doll is in an okay condition and definitely useful for sewing edwardian corsets. I paid 80€ for this baby and I think I made a great deal. I bought my "normal" sewing mannequin for 100€.
    The measurements are
    Bust: 86cm/~33"
    Waist: 60cm/~23"
    Hip: 98cm/~38"

    All the best,

    Auris Lothol
    Continue Reading
    Hello lovelies,

    I managed to finish something again! Hooray. There are so many unfinished projects which are almost done but do you think I can bring myself to end them?
    So, Wearing History had a black Friday sale and I was already playing with the idea of buying the Edwardian bust improver for a long time. And during black Friday sale I thought, why not and finally bought it. The parts were printed at work and I started to cut out everything on Wednesday.
    On Thursday I continued a bit after my Social Media class and today, on Friday, I finished the last seams.

    I used a very thin cotton fabric because I actually only wanted to make a mock up first. But then I said, whatever and my mock up turned into my final piece.

    I also made my double fold bias tape with the fabric. The instruction called for one with 1,5cm (I think it was 3/8 inch?) and I made a 3cm tape at first because I thought they wanted 1,5cm for one side. Yeah. It was late and I was tired.

    Fiddling with the round parts to get them fit the markings was time consuming. And I hated it.
    In the end they turned out to be uneven anyway even though it looked really even at first. No idea what happened while sewing. After sewing I stuffed the pads.
    The it was time for the lace.

    With the lace it suddenly looked to frilly. Maybe a bit too frilly? But the instruction didn't say how wide the ribbon should be. So I just went with it.
    I also added lace on the top and I was done. Hooray. And who thought it was a good idea to sit on the bust improver when I tried to do pictures on the floor? My fluffy monster Maja.


    Here is the finished product on my doll.


    I still have my Edwardian corset mock-up and it fit perfectly underneath. 


    Time needed: about 4-5hours with lots of breaks
    Cost: Pattern: 6,59$, Fabric: nothing, I took scrap material
    Satisfaction: 5/5

    All the best,

    Aurîs Lothol

    Continue Reading
    Older
    Stories

    Auris Lothol

    Historical costuming,
    Japanese Lolita fashion,
    travel adventures,
    and Gaming.

    Search This Blog

    Join me

    • youtube
    • Instagram
    • Twitch
    • Mastodon
    • Royal Duck
    Support me either on Kofi or directly via paypal!


    RSS Feed

    Loading...

    Followers

    Labels

    18th century (13) 1920s (1) 1930s (1) 1940s (1) 1950s (4) 19th c. - Edwardian (3) 19th century (9) 20th century (3) 500-1500 medieval (13) accessories (17) birthday (3) bobbin lace (12) Book binding (1) bring and buy (14) convention (19) Cosplay (124) cosplay year (4) Cosplayplan (6) costume - fantasy (8) costume research (2) crochet (13) cult party kei (7) disneyland (3) embroidery (12) event (14) fashion (4) fashion year (6) fingerloop (1) finished work (34) fukubukuro (14) gaming (1) German (3) Gyaru (5) Halloween (3) Hime Gyaru (8) himekaji (17) historical disney (1) horror (2) japan (17) Klosterarbeit (2) larme kei (14) Lolita (147) lolita closet (4) lolita teekränzchen (25) lolita year (6) market (2) masterpost (2) meet-up (2) museum (7) my cats (4) nails (2) ootd (58) otome kei (5) personal (67) photo shooting (3) polymer clay (2) regency (8) renaissance (6) review (26) ribbon stitching (3) royal duck (9) sewing (10) sewing pattern (2) Shopping (73) Steampunk (4) tea party (8) Top 10 (1) tour (1) Travel (46) Tutorial (35) undergarment (13) video (42) vienna (1) vintage (5) wip (79)
    Blogheim.at Logo
    • Disclaimer
    • Privacy Policy
    • Impressum – Legal Disclosure

    Created with by BeautyTemplates | Distributed By Gooyaabi Templates

    Back to top