
Tutorial: Cute apron
October 09, 2013Hello lovelies,
I translated a new and very lolita apron tutorial! The scans are from Gosu Rori 2, scanned by Miss Mandah. I hope you are able to read and sew it. If you have any questions, please ask me!
You need:
any colour cotton fabric: 100x100cm
Lace: 2m of any lace you want.
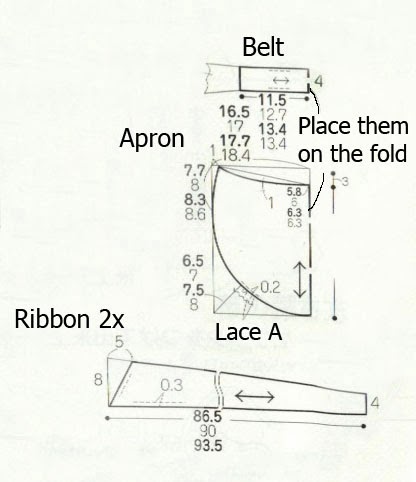
You need to do a pattern on paper with these.
You place the belt and the apron pattern on the fold as you only need one. You need two of the ribbon. I don't know why the japanese pattern says 4 cm when it is really 8cm.


Number 3 and 4 show you the right side (the one you wear in front) and you place the ruffles on them with the right side too.
Remember the 5.8cm to 6.3cm on the first pictures? This is the length from the midle to the point where you start to sew your apron to gather it. Don't forget, sew with the longest stitch length to achieve this gathering effect.


Aurîs☆
2 Kommentare
Hi! Let me double check in my book to see is something was cut off or missing from the original pattern.
ReplyDeleteThank you!
DeleteIn the first picture on the right side of the apron there is a blank and I am wondering if there should be numbers as well :)